10 Rocking Features in 10 Days: Better Firefox plugins and Gnash

Yesterday we took a look at Desktop Effects with Compiz. Today we turn to all the improvements for Firefox including the a better way to install plugins and the arrival of Gnash, a Free flash player.

So what is this new way to install plugins?

One of the most powerful features of Firefox is all the amazing plugins available for it. However, sometimes those plugins don’t work with the version of Firefox you may have. To solve that problem, the Ubuntu developers have created a list of high-quality tested plugins that can be easily installed in Ubuntu 7.10.

To get access to those plugins, go to Tools > Add-ons and then click on the “Get Ubuntu Addons” in the lower right:

Firefox add-ons dialogue

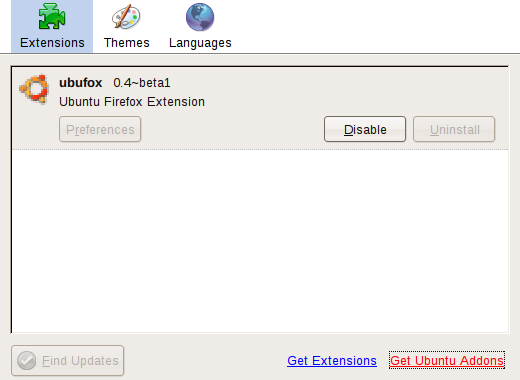
Click on that and then you will see a screen like below:

Firefox add/remove extensions dialogue

Search for your plugin and click to install. The best part about all of this? All of these plugins are installed via the same way as all the other software on your system, meaning all the usual tools such as Add/Remove, Synaptic and plain old apt-get will work as well.

So I get the plugin thing. What did I hear about Gnash?

Gnash is a Free Flash plugin, designed to help liberate Flash from the clutches of non-free software. For those you who run x86 (also called i386 or simply Intel), you have been able to enjoy the non-free Adobe plugin for quite some time. But for those on amd64 (also called x86-64 or 64 bit), PowerPC (old Apple computers, new Power.org IBM servers) and SPARC have been stuck. There were many hacks and workarounds, but they were just that, hacks.

That has all changed with the arrival of Gnash (and also Swfdec, another project to create a Free Flash plugin). Both of these projects have recently reached a major milestone: being able to play YouTube videos.

So if you want to try out Gnash, just select when you click to install the Flash plugin and choose it from the screen that pops up:

Firefox plugin install

Anyway, that is all for today. Come back tomorrow when we cram two sessions into one and talk about better drivers, including restricted drivers and printers. Until then!

LXer interviews John Hull of Dell

Those excellent folks over at LXer have managed to capture John Hull, the manager of the Linux Engineering team at Dell and ask him a few questions, all in the name of science of course. Ranging across topics such how John got into computers and Linux to Dell’s history and of course, Ubuntu on Dell. From the intro:

“It has been over four months since Dell started shipping computers preloaded with Ubuntu GNU/Linux to home consumers in the United States. Lets take a moment to look at the progress that has been made so far. John Hull, manager of the Linux Engineering team in Austin was kind enough to let me interview him by e-mail. Besides commenting on the current state of affairs with Ubuntu on Dell machines, he also offers some insight in how the Linux team at Dell works and opens a small window into the future of Linux at Dell….”

Read the whole interview at The LXer Interview: John Hull of Dell.

10 Features in 10 Days: Desktop Effects with Compiz

Well, so we missed a day. Fear not, today we soldier on to Desktop Effects with Compiz Fusion. It can be safely said that few features are as keenly desired as Desktop Effects. Ever since Compiz was announced XXX years ago, users and developers have been playing with the bling-tastic effects and wondering when it will hit a desktop near them. Well, the wait is no longer. Ubuntu 7.10 is the first major distro to ship Compiz enabled by default, for all users to have fun with.

So what is all fuss about these Desktop Effects?

Not only do Desktop Effects bring you lots of bling and shiny effects, they do offer a more natural feeling desktop, such as desktops sliding instead of jumping, scaling to see either all desktop or all windows and much more.

And what does the default 7.10 Compiz do?

One of the hardest tasks with enabling Compiz was finding the right set of plugins and features to turn on by default. As such, there are three features that stand out:

Alt-tab window switching
When you hit Alt-Tab, you get a bunch of little previews, allowing you to easily see and select the window you want:

Compiz alt-tab behaviour

Scale windows
When you need to see all the windows on a current desktop at once, this is what you need. Take a peek:

Compiz scaling windows

Wall of desktops
Much like scale is for an individual desktop, the wall of desktop shows you all the desktops and their open windows as if they were a wall:

Wall of desktops using Compiz
What if I want more/less bling?

Given one of the strongest reactions against Compiz has been from users of more traditional window managers, such as Metacity (the GNOME default). Equally strong has been the reaction from people who want all the bling, all of time. Fear not! If you are one of those users, your needs are well met. Just fire up the Appearance capplet and choose your level:

There is lots more Compiz can do. If you want another look at Compiz in Ubuntu 7.10, I recommend you take a look at this excellent blog post.

See you tomorrow!

Ubuntu Open Week October 07

Mon 22nd Oct – Sat 27th Oct @ #ubuntu-classroom on Freenode

With the up-and-coming release of Ubuntu 7.10 Gutsy Gibbon coming, we’re pleased to announce another Ubuntu Open Week, this time taking place the week following the Ubuntu 7.10 Gutsy Gibbon launch – Mon 22nd Oct – Sat 27th Oct on #ubuntu-classroom on Freenode. The sessions take place from 15.00 UTC to 21.00UTC

Ubuntu Open Week is a week full of 42 IRC tutorial sessions on a range of subjects, designed to help people get involved in the Ubuntu community. It is given by many of the brightest, most capable members of the Ubuntu community, and covers a range of subjects including packaging, bug triage, translations, accessibility, automated testing, loco teams, mentoring, Launchpad, kernel team, desktop team, training team and much more. In addition to this there will be sessions for Kubuntu, Xubuntu, Ubuntu Studio, and the newest member of the Ubuntu family, Gobuntu.

There will also be a special Ask Mark session (Wed 24th Oct @ 16.00UTC) in which you have two hours to ask Mark Shuttleworth, the founder of Ubuntu, your burning questions. Jono Bacon will also be providing a Community Q+A session (Wed 24th Oct @ 15.00UTC) in which you can ask your questions about the community, Ubuntu, Canonical and anything else.

read more

10 Rocking Features in 10 Days: Day 3: Sharing your computer with Fast User Switching

Yesterday we took a look at all the handy new features of X in Ubuntu 7.10 and today we turn to Fast User Switching which allows you to easily share your computer with others

What is Fast User Switching?

Having different people access your computer using separate user accounts is one way to keep your computer safer. It’s convenient too because different people’s settings can be stored separately. But if you find it annoying to have to keep logging off and logging in all the time to switch user, then Fast User Switching is the feature for you!

In a nutshell, Fast User Switching allows multiple users to switch quickly while staying logged in.

So how do I use it?

Well, first you need at least one other user on your computers. If you are uncertain about how to do that, please refer to this excellent wikipage on it or for the more visually inclined, there is a screencast (which also covers how to switch new users).

Once you have your users, it is pretty simple. On the upper panel, click on your name and you will see a list like this:

Choose the other user and you will get to a login screen. When they are done and logout, you are back to your screensaver. Unlock the screen and you are back on your desktop. It is that easy.

And yes, tomorrow, we will cover Desktop Effects with Compiz Fusion, as promised. Until then!